
Crossbody and sling bags cover a wide range of sizes and carry positions. To develop a useful style, buyers should explain how the bag will be worn, what it needs to carry, which hand should reach the main opening, and how the strap should adjust. Those decisions guide pattern, pocket placement, hardware, and sampling.
Choose the carry position and capacity
Describe whether the bag is worn across the chest, over one shoulder, at the waist, or as a compact everyday carry. List the items it should hold and any item that must remain easy to reach. A small bag for a phone and wallet needs different proportions from a travel sling with several compartments.
Capacity alone will not show whether the shape is tall, wide, shallow, or curved. Provide approximate width, height, and depth and, where possible, compare the bag with the objects it needs to carry. A compact nylon sling reference illustrates one smaller format.
Ask users to try the sample over the clothing they are likely to wear. Strap length and bag position can change with jackets, layers, or different carry orientations, so check the minimum and maximum adjustment points on representative wearers.
Set the strap and access requirements
Specify the strap’s adjustment range, width, padding preference, buckle location, and whether it should be removable or reversible. Explain where the main opening should sit when worn and which side pockets or quick-access areas are important.
Review the strap attachment points and hardware on the sample. The bag should be checked on a representative wearer and with typical contents, since a strap that works when empty may sit differently when loaded.
Map the opening and pocket layout while the bag is worn. A pocket that looks accessible on a table may be difficult to reach against the body; note whether the zipper pull, phone pocket, and main compartment should face the wearer or the outside.
Plan pockets, materials, and branding
Sketch the main compartment and any front, rear, or interior pockets. Clarify whether each pocket is for a phone, keys, travel documents, or another item, and provide its approximate dimensions. State preferred shell, lining, zipper, hardware, and trim options.
Share the logo artwork, position, size, and desired method. Curved panels, seams, and pocket openings can limit usable decoration space, so approve the logo placement on the sample or a production-representative proof.
Small curved panels and narrow gussets constrain usable capacity. For each pocket, note the object it should hold and its approximate dimensions, then check the sample with those objects to confirm that closures work without forcing the contents.
Evaluate the sample in use
Check strap adjustment, bag position, opening direction, zipper movement, pocket access, stitching, and how the sample sits with real contents. Record the wearer profile and carry setup used during review so feedback is specific.
A supplier quote can be clearer when it includes the product reference, size, material, strap details, hardware, logo artwork, colors, packaging, estimated quantity, and target market. Confirm any customization and timing for the chosen style.
Record hardware finish, strap adjuster location, zipper pull style, stitching color, and decoration method as separate approvals. This makes revisions easier to compare and helps the final product retain a consistent appearance across colorways.
Buyer questions
How do I choose a strap length for a crossbody bag?
Set the desired adjustment range based on the intended wearer and carry position, then check the range on a sample with typical contents.
Can the product image confirm how a sling bag fits?
It can show the general format, but fit and access should be assessed on a sample or a representative prototype.
Styles mentioned in this guide
These are product references, not a promise of stock or fixed specifications. Open a style page to review its current details.
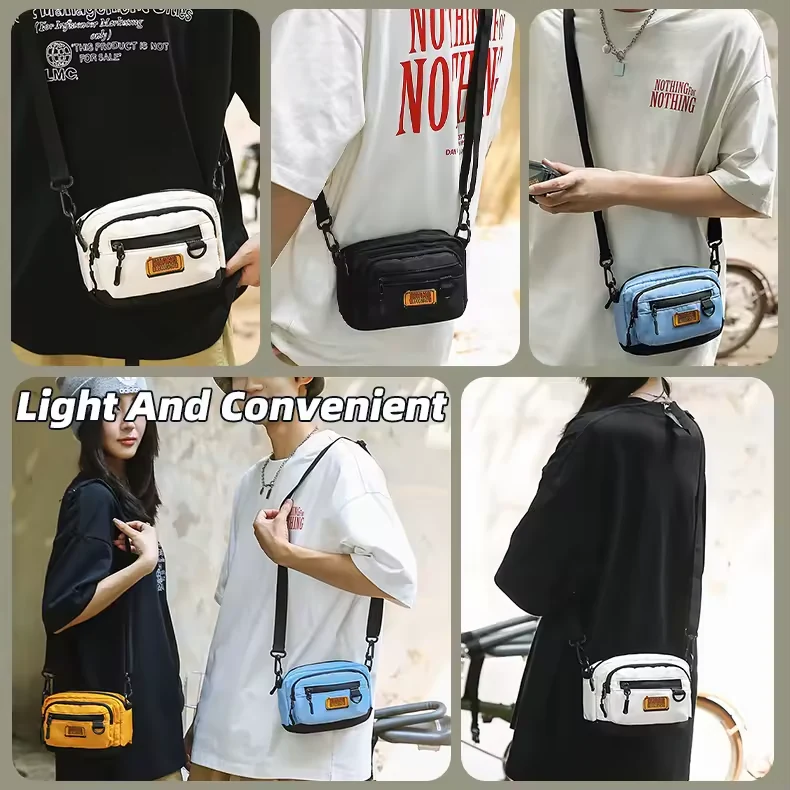
1.5L Nylon Geometric Crossbody Sling Bag
View product reference →
Need help applying this guide to a product?
Send the product reference, intended use, target market, and the details you want to confirm.